


Home > Motorcycle Community > Motorcycle Tech Tips > Checking and Changing Motorcycle Oil
Checking and Changing Motorcycle Oil
The oil in your motorcycle is the lubricating life force that keeps it running smoothly. The oil flows through the engine, coating the components. Without it, your motorcycle will overheat and eventually seize. You should learn how to check motorcycle oil to ensure your motorcycle continues to run at peak performance. Then, if needed, how to perform an oil change on a motorcycle.
How to Check Motorcycle Oil
Your owner’s manual will tell you how to check your motorcycle’s oil. It will also include recommendations to help your bike run at its best. Each bike has slightly varying specifics about the oil and maintenance needs. However, there is a rough general process that you can follow. Start by running the bike to warm the oil up. Then, turn the bike off and let the oil drain down.
Viewing Window
Most modern motorcycles have a viewing window for the oil level. It’s typically located on the bike’s side, near the engine’s bottom. Look at the glass to determine the oil color and level. There is a maximum and minimum line on the glass that the oil level should be between.
Dipstick
If your motorcycle has a dipstick, you will check the oil level with it. Check your owner’s manual for proper oil-checking procedures. Typically, you pull the stick out, wipe it down, and place it back in the bike. Then, pull it back out to get an accurate reading.
Clear amber- does not need changing
Dark and opaque- needs changing
Milky white- there’s coolant in the oil
How Often to Change Motorcycle Oil
While every manufacturer may recommend something different, a good general rule is to check your motorcycle oil every 5,000 miles. If you don’t ride often, check it at least once a year. You should also check your motorcycle oil before each ride if it has sat for a while.
Signs Your Engine Needs an Oil Change
Your owner’s manual will recommend how often you should change the oil in your bike. However, do not blindly go by this mileage indicator. There are other signs to look out for that your motorcycle needs an oil change.
Low oil on the dipstick or oil-level window
Increased running temperature
Excessive vibration
Loud engine noises
How to Change Motorcycle Oil
You must gather the right supplies before starting an oil change on a motorcycle. Motorcycle oil changes are a relatively quick and straightforward task. However, stopping to purchase supplies can drag it out unnecessarily.
Gather Oil Change Supplies
Gloves
Oil filter
New oil
Drain pan and funnel
A set of box or socket wrenches
Cleaning rags or shop towels
Using a motorcycle lift can also make changing your oil easier. However, it isn’t required.
Step 1. Clean Your Work Area
Before changing your motorcycle’s oil, clean up your work area. You don’t want dust and dirt in your garage contaminating the fresh oil you add to your motorcycle. Once your garage is clean, lay down cardboard and a large drip tray pan.
Step 2. Drain the Oil
Place your motorcycle over the cardboard and raise it if you have a lift. Put your oil collection pan under the bike. Take out the oil fill plug and then the drain plug. You may need to remove other motorcycle parts to get to these plugs. The oil will drain out of the bike while you wait.
Running your bike for ten minutes before draining can be helpful. The warmed oil will flow out better and faster. Any contaminants will also get suspended in the oil, helping to keep your bike’s engine cleaner. However, if you do this, be very careful. Hot oil and engine parts can burn you.
Oil System Types
How you drain the oil depends on the type of motorcycle you have. Some motorcycles, like a Harley Davidson V-Twin, use a dry sump system. Oil draining is done from a separate oil-specific tank with a plug or removable hose.
Other motorcycles, such as parallel twins and four-cylinder engines, use a wet sump system. The oil pan is integrated into the engine’s system. There is a plug at the bottom of the engine to drain the oil.
Step 3. Remove the Oil Filter
While you wait for the oil to drain, you can remove the old filter. There are two types of oil filters that you could encounter. The first is a spin-off. To remove this type, you simply grip and unscrew it. If your motorcycle has a cartridge-style oil filter, you’ll need tools to remove it. The exact procedure for removal can vary, so follow the directions in your owner’s manual.
Troubleshooting a Stuck Oil Filter
One of motorcycle DIYers’ most common challenges is a stuck oil filter. If you think yours is stuck, check that you are turning it in the correct direction. This may sound silly, but the strange placement of oil filters can get you turned around. Make sure you are turning the oil filter counterclockwise.
If this doesn’t solve the problem, you need a filter wrench. There are two types: universal strap or pawl wrench. These will help you get a better grip and leverage to loosen the filter.
Step 4. Install a New Oil Filter
Use a shop rag to clean up the old oil and the filter area. Then, use your finger to wipe some new oil on the gasket. This helps to create a solid seal for the new filter and gasket. Follow the same steps you took to take off the old filter in reverse to put on the new filter. Hand-tighten the new filter so that it is snug but not overly tight.
Step 5. Reinstall the Drain Plug
Once you see the oil flow turn into a trickle, it’s time to reinstall the oil drain plug. This can take five to ten minutes, depending on the amount of oil and its temperature. Screw the drain plug in by hand to prevent cross-threading.
The drain plug should be snug but not overtightened. You can use a torque wrench to tighten it to the manufacturer’s specs. If you don’t have a torque wrench, add an additional quarter-half turn after it’s snug.
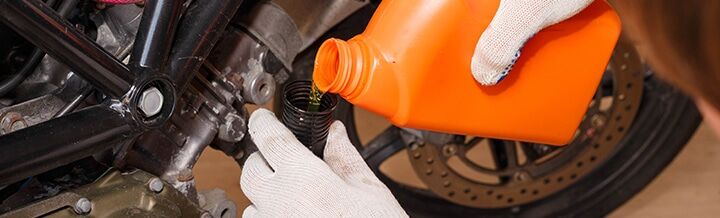
Step 6. Add New Motorcycle Oil
Every motorcycle is different regarding the amount of oil it requires. Check your motorcycle owner’s manual to know the exact amount your motorcycle needs. Only use motorcycle oil. Do not try to substitute the oil for automobile, marine, small engine, or diesel oil.
Use a funnel to pour the oil in to prevent spills on your bike. While pouring, periodically check the oil level. When the right amount of oil is added, the level should be between the lines on the sight glass. If your motorcycle uses a dipstick, check the oil level here.
After you’ve added the oil, start the bike and let it run for a few minutes. Then, turn the bike off and recheck the oil level. Check the bike for any leaks. If the oil level is low, add more. If the oil level is too high, drain some.
This is not a situation where more is better. Too much oil in your engine can cause the internal seals to fail from too much pressure.
Step 7. Properly Dispose of the Used Oil and Filter
The final step of changing your motorcycle oil is to clean up. Check your bike for leaks and wipe up any spilled oil that you find on your bike. Gather the old oil, filter, and soiled cleaning supplies. Dispose of them properly at a local dump or auto parts store that accepts used oil.
Clean Your Garage
If you have spilled oil on your garage floor, you need to clean it up. Otherwise, you risk the oil getting on your tires. This would cause a serious safety risk with traction loss. Kitty litter works well to soak up large oil spills.
A degreaser works to clean up the remaining oil. However, isopropyl alcohol also works well to clean up oil. It’s affordable and easily bought at any local grocery or pharmacy store. You can buy it in a pour or spray bottle. You don’t have to worry about it being damaging to painted surfaces, your skin, or plastic.
Properly Maintain Your Motorcycle
While modern motorcycles are impressive machines, they still require routine maintenance. One of the most important maintenance tasks is checking and changing the oil. This guide will help you check and change your motorcycle’s oil. That way, it stays in top running condition.
Request a quote for motorcycle insurance and protect your bike.
This site and articles contained herein are provided for general informational purposes only and are not a substitute or intended as professional advice. Please be sure to refer to your owner’s manual or consult a mechanic for information specific to your motorcycle. The information contained on this site and articles contained herein are provided on an “as is” basis with no guarantees of completeness, accuracy, usefulness or timeliness and without any warranties of any kind whatsoever, express or implied. Rider Insurance Company and its affiliates (together, “Rider”) assume no responsibility for any errors or omissions in the content of this site and articles contained herein. Any action taken upon this information is strictly at your own risk and Rider will not be liable for any losses or damages in connection with your use of this site and articles. Additional terms and conditions apply and are available at https://www.rider.com/plymouth-rock-assurance-general-terms-and-conditions/.